You just mention sweets and I will be on it :D Thats how much I love em! I always looked upon baking as an amazing work of art. I still do :) Its really amazing to see how much talent and interest people have towards baking. One such lovely group of people are the "Sweet Punch" team. :)
When I got the invite from the Sweet Punch team (Divya, Ria and Maria), I was delighted. An invitation to bake!! Wohooo :)
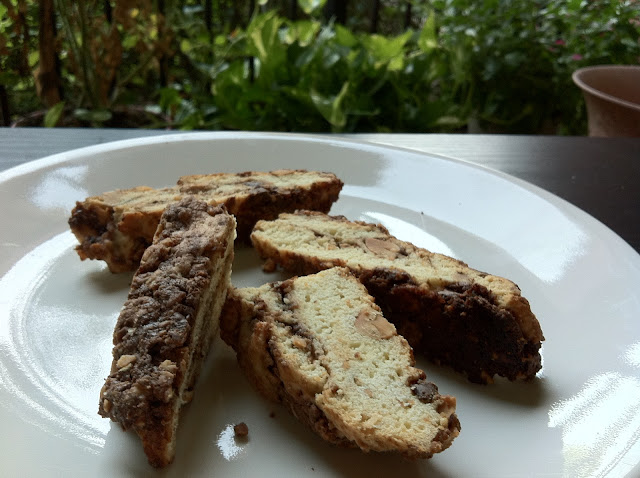
So here I was, all set for this experience. And I was even more delighted to see that the September Punch was my fav "Almond Biscotti". I love the store bought biscotti and this was a chance to stock up my fav biscotti :D And I sure did. The recipe was perfectly layed out in Joy Of Baking. I just had to follow suite. And here it was - Yummy and crunchy almond biscotti. I have written down the recipe here for your convenience and mine (easier access :D).
Ingredients
- Whole almonds - blanched, toasted and chopped coarsely - 3/4 C
- Sugar, granulated - 2/3 C
- Egg - 2
- Vanilla extract - 1 t
- Baking powder - 1 t
- Salt - 1/4 t
- All-purpose flour - 1 3/4 C
- Semi-sweet or bittersweet chocolate, chopped - 4 ounces (110 grams)
Method
Preparing the Oven
- Preheat oven to 350 degrees F (180 degrees C).
- Toast almonds for 8-10 minutes or until lightly browned and fragrant.
- Let cool and then chop coarsely. Set aside.
- Line a baking sheet with parchment paper. Set aside.
Preparing the Batter
- In bowl of your electric mixer (or with a hand mixer), beat the sugar and eggs on high speed until thick, pale, and fluffy (about 5 minutes). (When you slowly raise the beaters the batter will fall back into the bowl in slow ribbons.)
- At this point beat in the vanilla extract.
- In a separate bowl, whisk together the flour, baking powder and salt.
- Add to the egg mixture and beat until combined.
- Fold in the chopped almonds and chocolate.
For Baking
- Transfer the dough to your parchment lined baking sheet and form into a log, about 12 inches (30 cm) long and 3 1/2 inches (9 cm) wide.
- You may have to dampen your hands to form the log as the dough is quite sticky.
- Bake for 25 minutes, or until firm to the touch.
- Remove from oven and let cool on a wire rack for about 10 minutes.
- Reduce oven temperature to 325 degrees F (165 degrees C).
- Transfer the log to a cutting board and cut into 3/4 inch (2 cm) slices, on the diagonal. Place the biscotti, cut side down, on the baking sheet.
- Bake for about 10 minutes, turn slices over, and bake for another 10 minutes or until golden brown.
- Remove from oven and let cool.
- Store in an airtight container.
- Makes about 16 biscotti.
Yummy biscotti is ready to be devoured. :D


Looks beautiful..your biscotti is just perfect
ReplyDeletePavithra
www.dishesfrommykitchen.com
just perfect.... sometimes i wish i was eating egg too then i wudnt be restricted to such tempting delicacies :) but i'm trying my best to create them eggless :) thanks for dropping by my space
ReplyDeletedelicious looking biscotti fabulously done
ReplyDeletei wish i cud ve participated too... bt :( urs luks delish
ReplyDeleteyou made it perfectly....biscotti looks so yummy n tempting..superb loved it !!
ReplyDeleteI love biscottis and Im seeing it on some of my blogger friends posts as they participate in Sweet punch...Yours looks very good. First time to your blog..Lovely blog and awesome pics...Following you...
ReplyDeleteONGOING EVENT: ABC Series - A for Apple
Biscottis look scrumptious.
ReplyDeleteperfect biscuitee
ReplyDeleteu are taged in 7link challanged game see at my blog
Biscotti looks perfect and yummy...
ReplyDeleteBiscotti looks yummy Gopika. Love ur collection of recipes.
ReplyDeleteFollowing you :)
Vardhini
They are yummy & perfect..
ReplyDeletenice biscotti...yummy.
ReplyDelete-Aarthi @munchmunchcrunchcrunch
HLI-DATES
so yummy!!!!!!!!!!!!lovely presentation
ReplyDeleteIrresistible biscotti over there! Loved the way it's prepared...yumm!
ReplyDeleteThanks for visiting me, apologize for the late return! :D
Reminds me of Cake Rusk......look so perfect , i just wanna grab some.
ReplyDeleteGreat going Gopz..Looks very crisp and yum !! I know have been MIA for quite some time..Mail u soon..
ReplyDeleteBiscotti looks fab.. Very well baked and presented..
ReplyDeleteFirst time here and enjoyed browsing through your space..
Glad to follow u .. great going girl..:)
Reva
delicious n perfectly made
ReplyDeleteCrisp looking biscottis! Love the nature background on the first picture!
ReplyDeletePerfectly made..perfect snack..love it
ReplyDeletewow its such a yummy treat...awesome clicks...:)
ReplyDeleteWelcome to sweet punch and biscotti is a perfect bake to start the punch
ReplyDeleteWell done with this biscotti - looks beautiful =)
ReplyDeleteperfectly baked bisotti..looks crisp and delicious!
ReplyDeleteIrresistible, crunchy biscotti!!!
ReplyDeletePrathima Rao
Prats Corner
Feel like grabbing some,looks fabulous..
ReplyDeleteExcellent treats! I would love some right now :), Miriam@Meatless Meals For Meat Eaters
ReplyDeleteAarthi biscotti looking fab and full of flavours...ummmm
ReplyDeleteI love biscotti because the crunchy texture is just perfect for my liking. And now if you add chocoate and almond in it... oh my that's like my most favorite biscotti!!!
ReplyDeleteOh love the crunchy texture of your biscotti !!feel like munching now..You have got lovely space...will come back for sure
ReplyDeleteDeepa
Hamaree Rasoi
Looks yumm.
ReplyDeleteLove them with a cuppa :) Looks yummy! Have a great weekend!
ReplyDeleteBiscottis look perfect--Glad you liked it,thanks for baking with us!!
ReplyDeleteLooks Delicious!!!!
ReplyDeleteWow, its looking so yummy. Nice blog and nice recipes :)
ReplyDeleteThanks for leaving a nice comment @ my space :)
Cheers!
First time to your blog . came to your blog after looking at your comment in my blog.. Interesting recipies...I really enjoyed it..
ReplyDelete